Using Sections for Segmentation
It is sometimes helpful to produce a report that is segmented or subtotalled on some value or range. This example illustrates how to segment a report based on classmark.
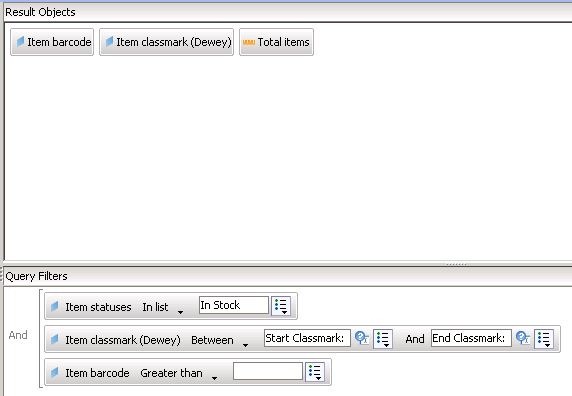
The Query
This should return, as a minimum, the classmark and number of items in the classmark. This example also returns the barcode so that we can do a detail report tab with the actual item barcodes listed.
The query should be limited in some way for performance reasons, otherwise you would be counting every item in the database. In this example I have limited the query to in stock items. I have also added prompts for start and end classmarks. The start and end classmarks are only used for performance reasons – they are not used in the segmentation. Finally I have added a filter to return only barcodes greater than a single space. Note that I am assuming that:
- All in stock items have a barcode. If this is not true, this query will miss some items
- I’m not interested in anything with no classmark. This query will not return anything with a null classmark, no matter what ranges are used.
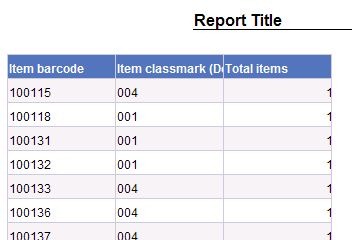
The Report
Running this query for the first time produces the usual default report:
In this example, we want to segment the data by classmark group i.e. 000 – 009, 010 – 019, 020 – 029 etc. To do this we will create a variable which I’ve named Classmark Group which is the two leftmost characters of the classmark (the name of the variable isn’t important and you can adjust the granularity by making it the three leftmost – or one leftmost characters). The variable definition looks like this:
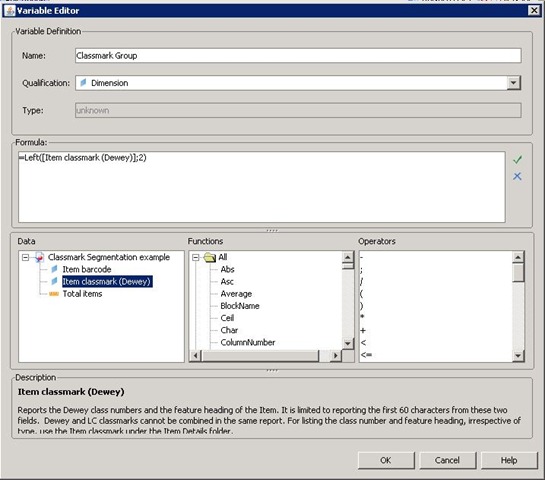
The actual formula is:
=Left([Item classmark (Dewey)];2)
Drag and drop this variable into the table (it doesn’t matter where):
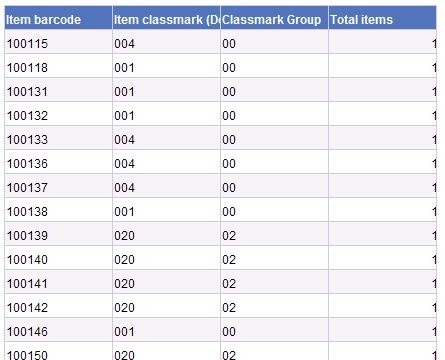
Now Right-click the new Classmark Group column and pick Set as Section:
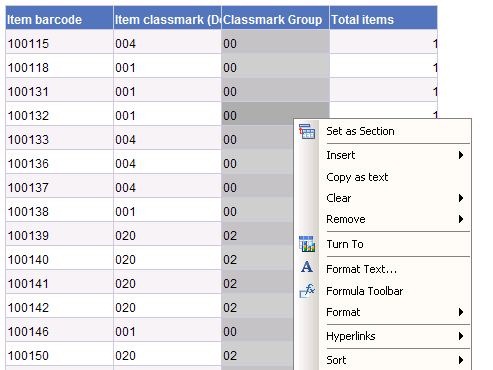
This adds a separate heading for each Classmark Group thus:
In this example I tidied up the appearance and added some headings etc, and then made two copies of the report tab (right click the report tab):
I then modified the copies as follows:
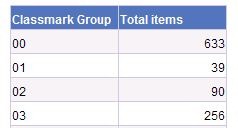
In copy 1 I deleted the Classmark and Barcode columns to give me a raw total for each group
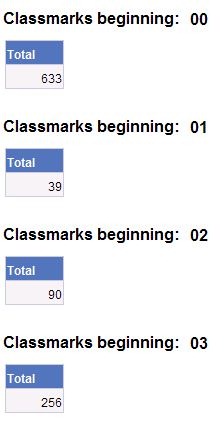
This is actually overkill as you can display the same data just by dragging the classmark group and total items into a new report tab:
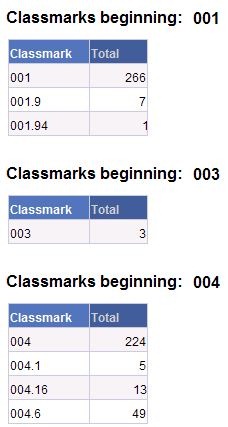
In copy 2 I deleted the barcodes to give me a summary by individual classmark:

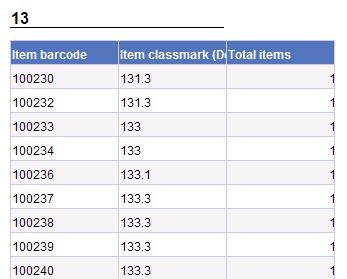
Copy 3 was a detail tab. It listed each barcode and it’s associated classmark, again segmented by classmark group. The item column was redundant and I swapped the barcode and classmark columns simply because it looked more logical that way. Note that this report tab could be huge: it essentially has one line for every In Stock item in the selected range.

Note that setting up this report takes longer to describe than to do, and once set up will adjust itself dynamically. You can also change the granularity retrospectively. If you decide your groups are too coarse or too fine you can adjust the variable definition (change the 2 to a 3 or a 1 in the formula). The report should sort itself out to match your change. Here for example is the result of changing the formula from =Left([Item classmark (Dewey)];2) to =Left([Item classmark (Dewey)];3)
Note also that this is all done from the same query refreshed once in this example. You should need neither multiple Web Intelligence documents nor multiple runs of the same document to get the kind of output illustrated here.
Please do leave a comment if this is helpful – or if it isn’t!


Recent Comments