Decisions Blog

5.9E1 Decisions Universes available

We are pleased to announce that there are updated 5.9 Decisions universes available.

You will find the release notice (Decisions_59E1_release notice v1.2.pdf), and download (Decisions Universes (LMS_5.9E1_Universes-sip.exe) on the MySupport portal.

The main changes in this release are below. Please see the release notice for more details.

  • New objects in the Circulation universe for Borrower edit operator, Ad hoc template name and Message create operator and Message create date
  • A new object in the Borrower notifications universe, Ad hoc template names
  • Update to the ‘Number of ad hoc communications’ object in the following universes: Circulation, Borrower notifications, Inter-library loans, Orders and Subscriptions

If you have any questions do get in touch with the Support team.

5.8 Decisions Universe Available

We are pleased to announce that the 5.8 Decisions universes are now available on general release.

You will find the release notice for this release on the MySupport portal.

The main changes in this release are:

  • A new universe for reporting on Borrower Notifications
  • A new object for ‘BL Reference’ in the Inter-library loans universe for BLDSS Web requests
  • New objects in the Inter-library loans universe for non-truncated versions of the author, title and multi-volume objects
  • The name ‘Talis’ has been removed from all object names and descriptions in all universes

If you are still running Alto 5.7 but want to use this version of the universes you may do so. The only object that will not work with Alto 5.7 is the new ‘BL Reference’ object.

Web Intelligence issue

SAP have announced this morning that a Java Runtime certificate expired on Sunday 8th September.  This will impact all library staff using a Decisions Web Intelligence license.

On accessing Web Intelligence you may be presented with a warning message prior to running Decisions reports.  On acknowledging this message, you should be able to continue to access your reports.  If you have any problems with accessing your reports, on acknowledging this message, please raise a case or contact us directly.

Over the forthcoming days SAP will send us a software patch that needs to be applied to your Decisions server.  Once received, Consultancy will send out information on the steps required to apply the software.  For our Assist Managed Customers we will complete this work on your behalf.

If you have any queries please contact Support.

Technorati Tags: ,

Editing Decisions users

We have had a number of questions recently about amending the names of users in Decisions. This looks a little different for folk using XI R3.2 and those using XI R2 versions, but the principles are much the same. Here is the procedure illustrated in XI R3.1: but first a very important distinction –

  • A User is in effect an individual log on/password combination regardless of who uses it. Most Decisions users have a “named licence” arrangement which means that each log on and password should be for the exclusive use of one individual (i.e. not shared)
  • A Group in Decisions is merely a collection of permissions to which one or more users (and or sub-groups) can be linked, so for example individual named users Sally, John and Joe might all be linked to the same Web Intelligence Groups that defined their permissions. There is no such thing as a log on and password for a Decisions Group. It is more like a domain or category

User names can be changed. The process is as follows:

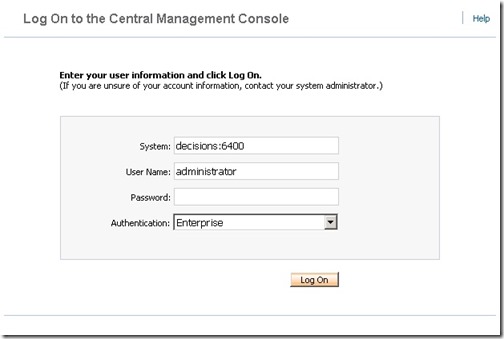
Log on to the Central Management Console as a user with administrative privileges:

Change user name 1

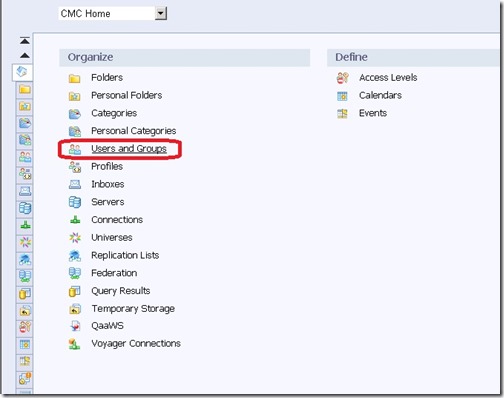
Select Users and Groups:

Change user name 2

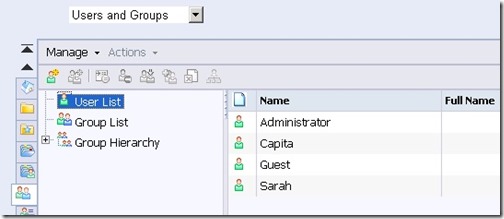
Then select User list:

Change user name 3

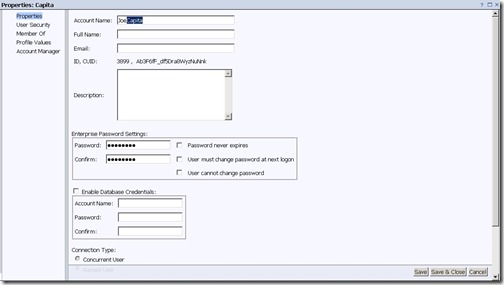
Suppose in this example that we wanted to change the name of the user “Capita” to “Joe” to make its ownership clearer. Simply Double click the user Capita, edit the name to read Joe, adjust anything else you wish like password and password rules, then Save and Close:

Change user name 4

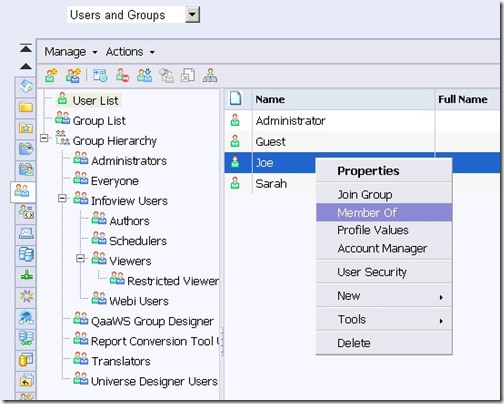
Changing the name of a user in this way will not change their links to (permission) Groups and any items in their Inbox will remain the same; but if you wished to check group membership, right click the user and select Member of (or if still displaying the edit dialogue select Member of in the left palette)

Change user name 5

Different libraries will have different group structures, and note that users can belong to multiple Groups.

Change user name 6

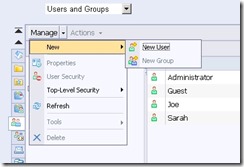
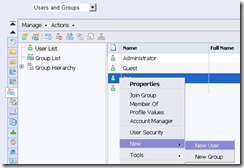
You can create new users either from the Manage drop down in the Users and Groups area, or by right clicking and selecting New User:

Change user name 7     Change user name 8

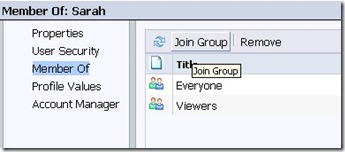
Setting up user permissions is rather beyond the scope of this post (it is covered in the Administration webinars) but in many cases you can in effect replicate an existing user’s permissions by adding the new user to the same groups using the Join Group menu item:

Change user name 9

Note however that this may not work as expected if the user has been assigned permissions directly (not very good practice but permitted).

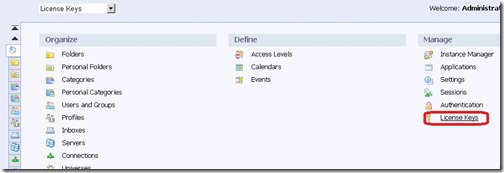
Finally if you want to know how many users your license permit, select the License Keys option in the main menu:

Change user name 10

I trust that this is helpful. If you are still struggling feel free to raise a case

Decisions Standard Reports

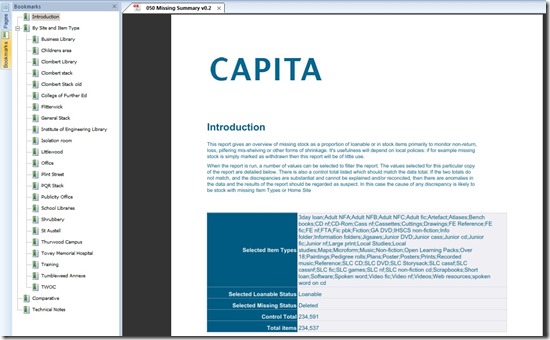
Standard report example

A set of standard reports isnow available for installation and use on later versions of Decisions (for exact compatibility please see below). These are all written in the normal way in Web Intelligence so can be used as examples and/or as the basis for local variants. If for instance you want to add or remove columns, or perhaps use a table or a bar chart instead of a pie chart then the reports can be edited in the usual way.

There are 23 reports in all covering the following areas:

  • Library Performance
  • Operational Management
  • Purchasing   
  • Reference   
  • Stock Management

The reports are compatible with Decisions XI R3.1 Service Pack 2 and later. They can be accessed from the downloads area of My Support (https://mysupport.capita-software.co.uk/Downloads.aspx) – the usual login is is required. An installation guide, a user guide and a release note are included in the download package. For further details or assistance, please contact libraries-enquiries@capita.co.uk.

Technorati Tags: ,

3.1 Beta Testers needed

Most Decisions customers develop a set of reports that meet their needs and are adapted to their own data and operating procedures. In addition, Decisions provides a high degree of flexibility in answering one-off queries such as Freedom-of Information requests. 

We have however long recognised that “standard” reports are helpful (even if just as “how-to-do-it” examples) and have for some years provided samples of reports that can be used to support CIPFA/SCONUL reporting, and reports for Bridge Pro customers on self service terminal usage.

We are now developing a set of Decisions reports in Web Intelligence covering a number of other common requirements which we would like to be able to make available to any Decisions users who would like to make use of them. These are ordinary Decisions reports based on standard universes so can be loaded, run, distributed and/or used as the basis for local variants, just like any other Decisions report.  The set we have so far are as follows:

Area

Report

Library Performance

010 Active Borrowers

020 Outstanding Reservations

030 Loan History

040 ILL summary

050 Missing Summary

060 Annual Summary of Loans (grouped)

070 Loan Site for Prism Renewals

Operational Management

110 Daily Issue profile

120 Cataloguing

130 Stock Rotation

140 Fines and Charges

Purchasing

210 Purchases grouped

220 Order committed but not arrived

230 Popular titles

240 Order items not subsequently loaned

250 Works with Outstanding Reservations

Reference

310 Serials

320 Types and Sites

330 Fund List

Stock Management

410 Missing Stock Summary

420 Stock List for a Shelf Range

430 Under Used Items – Overview

440 Under Used Items – Action List

One of the interesting issues with standard reports is that whilst all our customers use the same database tables, the detailed data stored in those tables may vary, as may the uses to which they are put. For example some customers may use the Sequence field for one purpose and some for others, some may use Dewey and some UDC – or both. Certain item types or borrower types may be special and so included or excluded. This implies a need for testing by a range of libraries.

So we are looking for folk who would be willing to take some or all of these reports for a test drive and report back on any errors or omissions and/or suggestions for improvement. If you would be willing to participate in this please add a comment below or email me. You will need to be on the later version of Decisions (3.1) and be happy about using Web Intelligence reports. We will provide instructions for loading the reports

Technorati Tags: ,

Success Rate of Overdue Letters

One of the issues that folk sometimes want to check is the effectiveness of their overdue letters: that is what proportion of items are returned following an overdue letter. There are several ways to approach this. Here is one.

Overview

The report is based on the assumption that any one LOAN_ID relates to a single issue, multiple optional renew transactions and a single discharge. There are two queries. The first query returns all the Overdue letters in a date range, including the LOAN_ID. The second query returns loan transactions that meet two criteria:

  • They must be discharges
  • The LOAN_ID must be associated with a letter in the same date range

The two queries are then merged. Wherever the second query found something, the loan was discharged: i.e. the Overdue letter was “successful”

Query 1 – the Overdue Letters

This returns the LOAN_IDs in a date range. The Letter number and Date of letter are additional “nice-to-haves”
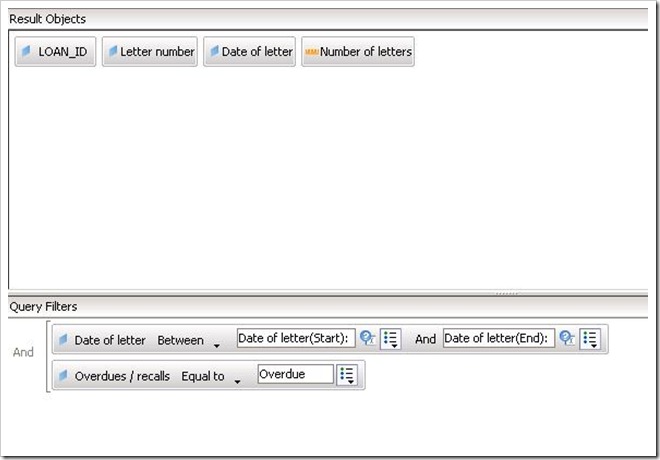
Query 1

You will note that the letter dates are set up as prompts in this example. These dates can be selected directly instead, although this means modifying the report whenever it is run.

Query 2 – The Loans

This returns relatively little data. Because it is filtered to return discharges only, if a LOAN_ID is found, then we know that that loan was discharged.
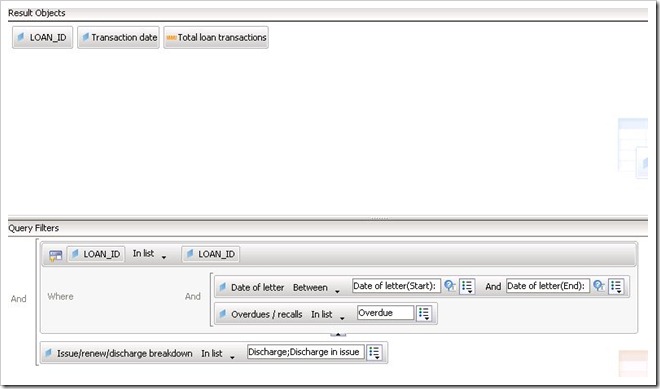
Query 2

The filter uses a sub query. What this says in effect is “go away and find the LOAN_IDs where there was an overdue letter in the date range, then use this list of LOAN_IDs to search for discharges”.

Why not use one query?

On the face of it, it looks like it should be possible to put everything into one query like this:
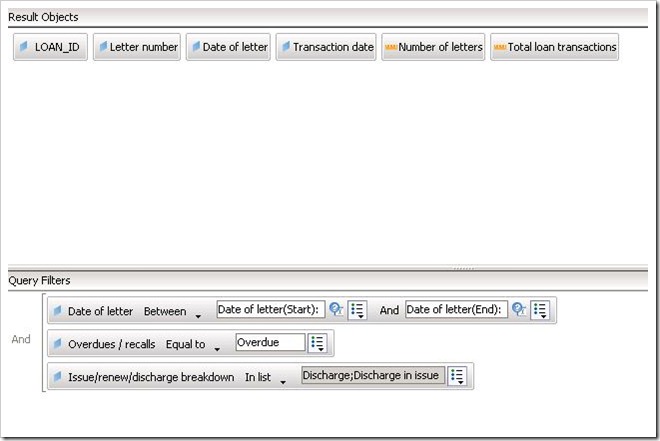
Query 3

There are two problems with this.

  • The information about letters and the information about loans are in different parts of the database and Decisions must generate some fairly complex SQL to return the data
  • Even if Decisions is successful at returning any data at all this won’t return any data about letters  where the item was not discharged: i.e. this query would at best only return “successful” letters not unsuccessful ones

So whilst two queries and a sub query looks complex it is actually the best way to get the data that you want.

In the Report

There are many ways to use the data in a report. By default you will get two tables. The first contains all the stuff about letters…Report 1
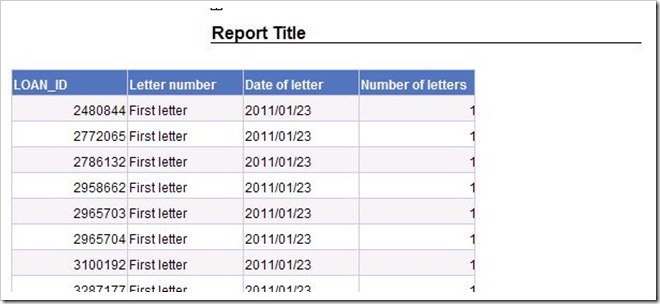
and the second contains all the loan data. I started by deleting this second (loan data) table completely.

Next, drag Total Loan Transactions onto the Number of letters column and let go. This overwrites the column:
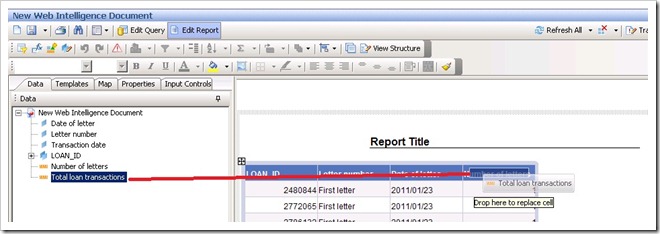
Report 2

You now have the detailed data that you need. Wherever there is a 1 in the last column, that book was returned.

If you want to add the date that it was returned to the table you will find that you cannot do so directly. In theory there could be many different transaction dates for a single LOAN_ID (Issue, Renew etc) and Decisions doesn’t know what you do: that there should be just one discharge transaction for every LOAN_ID.

You know however, and there is a way of picking Decisions up by the neck and growling “read my lips”. Create a variable (I named it Discharge Date), set it equal to Transaction date and make it a detail of LOAN_ID. This tells Decisions that there will be just one (or zero) transaction dates for any one LOAN_ID. It will then let you add it to the table.
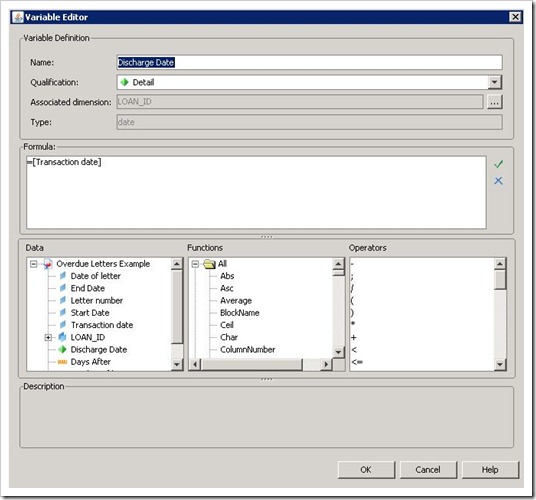
variable 1

I created a second variable that used the DaysBetween() function to work out how long after the letter date the item was discharged. With some further tidying up and formatting the result looked like this:
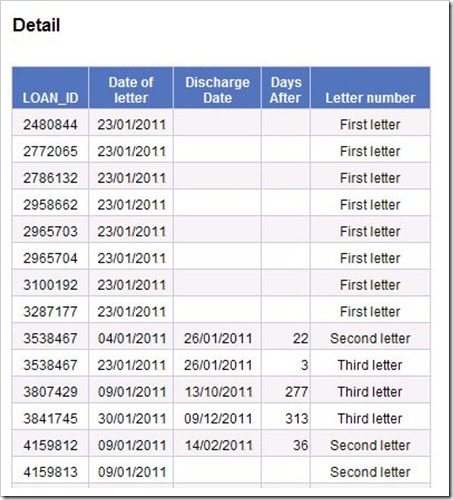
Report 3


A summary

A final touch is to add a summary table. Add a new report tab or drag the main table down a bit and use the space created. Select (CTRL-click), drag and drop Total Loan Transactions and Number of letters into the report.
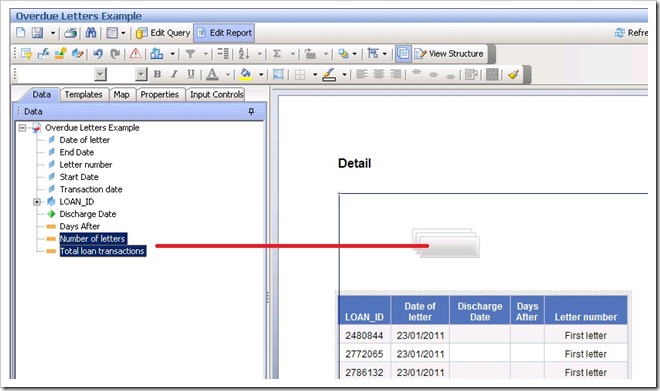
Report 4

This creates a simple four-cell table containing the gross numbers:

Report 5

You can if you wish rename the headings to something more sensible and/or tidy up alignments to produce something like this:

Report 6

If you try this (successfully or unsuccessfully) I’d be most interested to hear how you got on: please do leave a comment

Technorati Tags: ,,

Counting Overdue Letters

Alto records Overdue notices at the level of a loan. The bundling of several such notices into a single printed letter for a borrower happens outside Alto itself. The notices may even be sent by email rather than printed.
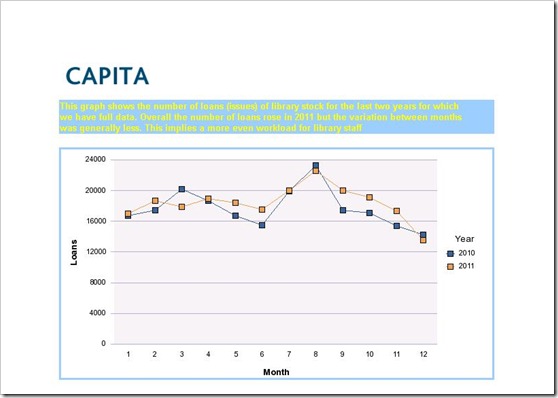
Capita is currently looking at enhancements to the whole area of notifications; but in the meantime, it is often possible to get a good approximation of the number of actual physical letters sent out. This assumes that the letter despatch process creates one physical letter for every Borrower Barcode for all notices sent out on a given day. It may not give correct results if the letter creation scripts are run more than once for the same borrower on the same day.
In this post I’ll illustrate a basic report and also a more advanced one, assuming in both cases that an analysis is needed by Borrower Type. The examples are created in Web Intelligence in Decisions based on BusinessObjects XI R3.1 but the same approach could be used in Desktop Intelligence and/or Decisions based on BusinessObjects XI R2.

The simpler report

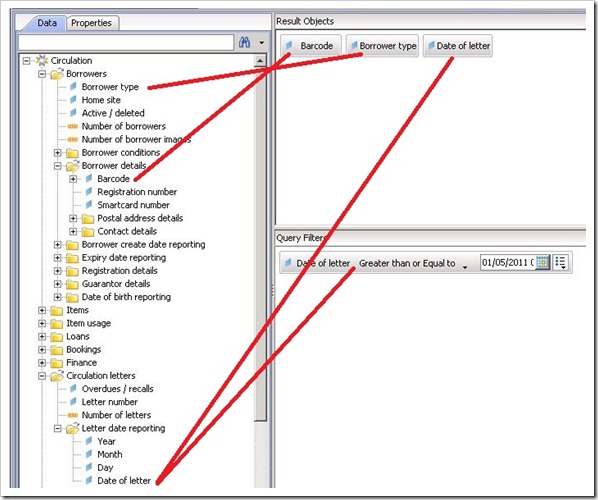
Start by creating a query like this:

Query_simple

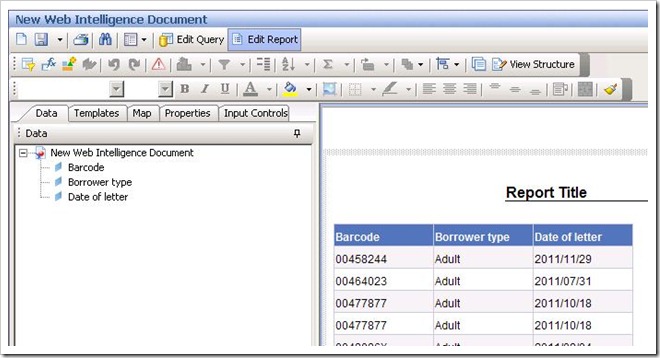
Obviously the date cut off can be changed to suit your preferences. You may also want to filter on Overdues/Recalls and/or Letter Number. When refreshed, this produces a default report like this

Report_simple_1

The next step is to create a variable that counts the number of unique dates for each barcode. There is a gotcha lurking here. By default a date displays as (say) “2011/11/29” but under the bonnet it is a date and time, so Decisions would regard these two as different dates for the same barcodes:

Report_simple_2

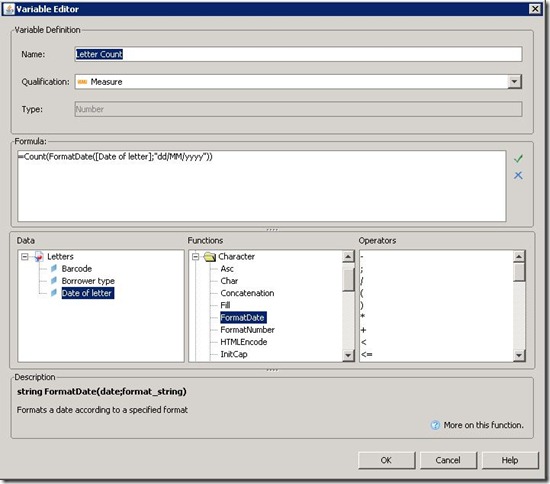
The solution to this is to turn the dates into ordinary strings before you count them. This bit is somewhat “techie” so unless you are happy to get involved in the details you might just want to cut-and-paste the formula:

=Count(FormatDate([Date of letter];”dd/MM/yyyy”))

[…depending on your browser you may see vertical bars around dd/MM/yyyy above. This should be double quotes]

Report_simple_3

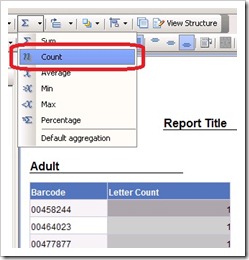
Drag your new variable and drop it onto the Date of Letter column (you could delete the Date of Letter column and add the Letter Count separately: we are just re-using the redundant column).

You now have a list of the barcodes with the number of letters. You can do two more things just to make it a bit easier to interpret, Firstly you can right click the Borrower Type column and select Set as Section. Secondly you can add a column total to the Letter Count column:

Report_simple_4 Report_simple_5

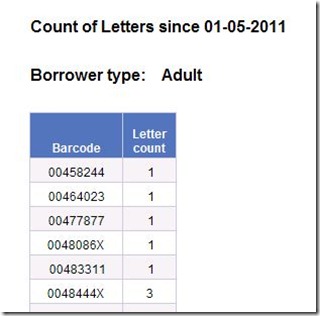
With some tidying up of headings and column widths, the report might look something like this:

Report_simple_6

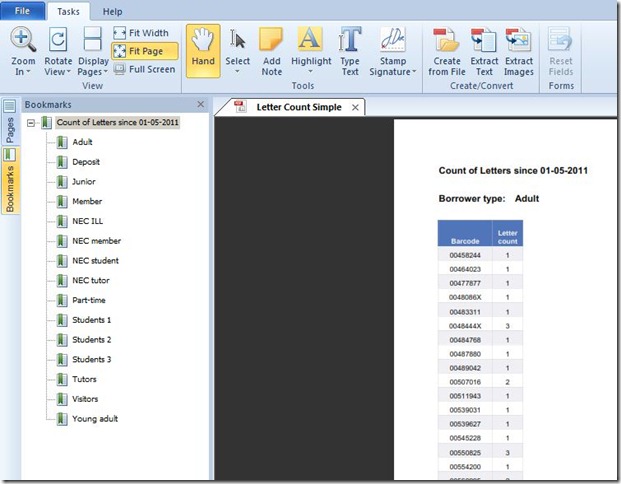
Exported to PDF there would be a bookmark for each section:

Report_simple_7

A more Advanced Report – Adding a Summary

The approach described above will get you the data but not necessarily in the most convenient form. You may not want pages of individual barcodes. If all you want is a total for all barcodes in each Borrower Type, there is a way to do this, but it requires a modification to your variable. If you just drag borrower type and your letter count variable into a new report tab, you might see something like this:

Report_simple_8

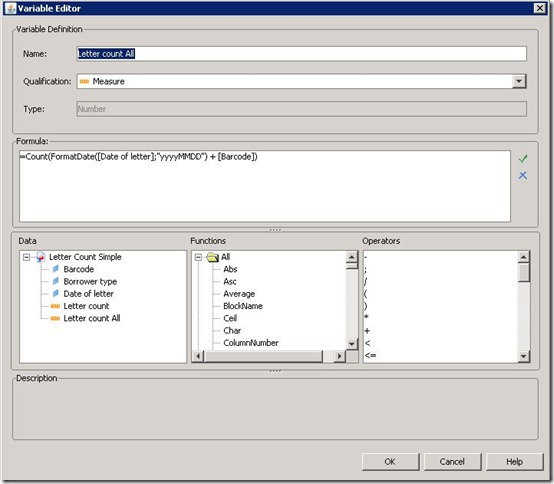
The numbers look ridiculous. The reason is that Decisions can’t guess what you want and is faithfully counting the number of unique letter dates for each Borrower type – roughly, letter runs for each borrower type. To get the result you want, the easiest way is to get Decisions to count each unique data and Barcode combination. This involves creating a new variable (or modifying the old one) thus:

Report_simple_9

The formula counts each unique combination of day/month/year plus barcode and is now:

=Count(FormatDate([Date of letter];”yyyyMMDD”) + [Barcode])

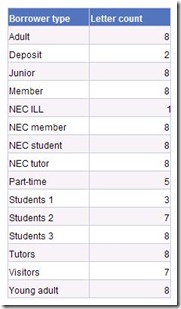
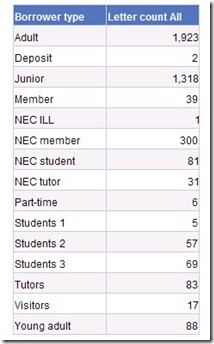
If you use this new variable in a summary report you get something like this:

Report_simple_10

I hope this is helpful. Please do add comments to let me know how you got on with it

Technorati Tags: ,,

The two parts of Web Intelligence

A query arose recently about modifying an existing Web Intelligence report which highlighted a fundamental aspect of Web Intelligence which is, I suspect, widely misunderstood.

For Web Intelligence is not a single tool but two tools in one. It contains:

  • A query tool which allows you to specify the subset of the raw data you want to bring back to work with
  • A report tool that you can use to create a report using that data subset

The query is a bit like a shopping list you take to the supermarket (…potatoes, onions and carrots…). The report is like the recipe – it defines how the basic ingredients are served up to the consumer of the report. Alternatively you could think of the query as analogous to an artist’s palette where the report is the painting.

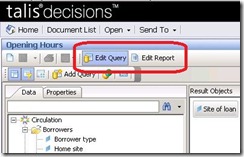
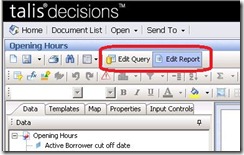
You can tell which tool is active in by looking at the “Edit Query/Edit Report “ buttons at the top of the screen

Query - report 1 Query - report 2

Part of the confusion stems from Web Intelligence striving to be helpful, but overdoing it a little. If you create a new query in Web Intelligence and then refresh it, it will create a default report containing a simple table with the query results plus a placeholder for a heading. It will also flip over to the report tool when a query finishes refreshing, all without so much as a “by-your-leave”

If you subsequently amend the query Web Intelligence behaves in a perfectly logical fashion: it amends the data available to build the report, removes any data from the report that is no longer available, but does not attempt to add new data to the report itself (how could it? You might have modified the report in countless ways since it was generated).

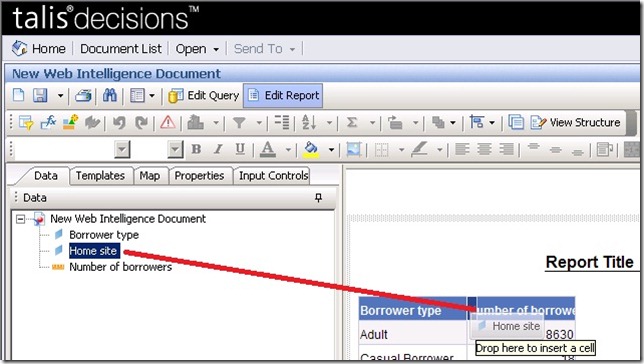
The bottom line is if you create and refresh a query, and then add more data to the query and refresh again, the new data will not be added to the report automatically; it will appear in the data panel on the left, from whence you can drag and drop it into your report:

webi drag and drop

[When dragging and dropping, if you hover near the boundary between two cells you will see a small darker rectangle as shown. Dropping here inserts a column. If the darker rectangle covers most of the cell, then dropping overwrites whatever is in the column already]

Technorati Tags: ,,

Logos and Graphics

Most Decisions reports are working documents: the content is the thing and default layout etc is good enough. Occasionally though the need arises to add branding to a report. One of the useful tricks up the report designer’s sleeve is the facility to add graphics to a report. Here is an example where the Capita logo has been added to the report header

Logo 1

There are two ways of achieving this. If the graphic is available over the web, the easiest way is:

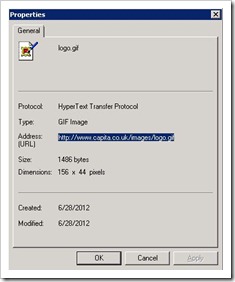
  • Find the graphic you want to use, right click it, select “Properties” and note the URL, height and width
  • Add a blank text box to the report header (or wherever else you would like to see the graphic)
  • Put the URL of the graphic into the text box
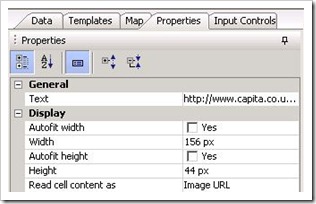
  • Select the new empty cell and in cell properties set the height and width to match the graphic and set Read cell content as to Image URL

Logo Properties  Logo 3

In a later post I’ll cover the other way of adding a logo